Tuesday, November 29, 2011

Dont Toss Yer Punkins!

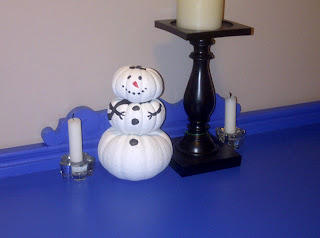
I have a lot of pumpkins still sitting around my house (the mushy ones have been thrown away) and didnt really know what to do with them. So I looked up some cute craft ideas for winter and found this great way to salvage yer pumpkins and create some winter decor!

Pumkin Snowman:
You can use large or small pumkins for this project, the bigger the pumpkins, the bigger the snowmen!

1. Cut off the stems of the 2 base pumpkins so that they will sit on top of eachother nicely; you can keep the top pumkin stem on (it will be the hat).

2. Spraypaint the pumpkins with white. I just used Kilz spraypaint primer. You can use any white spraypaint though. I did about 3 coats to make sure all the orange was covered. Allow to dry for at least a couple hours.


3. Once the pumpkins are dry, decorate them however you want. I used permanent marker and craft paint to draw in eyes, nose, mouth, scarf, hat and buttons! Pretty cute, and it cost me nothing!

Tuesday, November 22, 2011

1930's Vintage Sideboard

This vintage sideboard is amazing AND huge! It was quite expensive as its walnut and in great shape for its age. I'll be working on this piece sometime in the near future; I cant wait to get started on it! If you're interested in something custom, always let me know before I start a piece. Stay tuned....

Before:

Green Waterfall Dresser *SOLD*

This is a vintage waterfall dresser that was finished in a custom bright green color, lightly distressed and glazed in black to give it a nice vintage, worn look. The handles have been painted black and are brass (possible even solid, making them very valuable). It's solid wood and has 6 spacious drawers lined in black and white paper. The mirror detaches for transport. I think this would look fab in an entryway or in the kitchen or dining room as a sideboard! Available for $300.


Shabby Aqua Trio

This vintage dresser and side tables were painted the same custom shabby aqua color but actually ended up going to different buyers. I loved them so much after they were done that I wanted them for myself, but so did a ton of other people, so I had to let them go. The picture of the side tables is the accurate color.

Before:
After:

Before & Afters

All of these pieces are ones that I have already finished and sold or kept for my home. Just something for ya to look at while I'm in the process of learning how to blog and getting my act together!

White Shabby Dresser: I dont have a before for this dresser as I made it for my bedroom, until I found something else! It was a bright reddish-brown color before this beautiful Antique White.


Green Printed-Drawer Dresser: This vintage dresser was painted a couple different colors before I got my hands on it. I painted a few coats of green then covered the fronts of the drawers in a damask paper, sprayed the original hardware, and voila! A dresser that was bought for a couples first baby! (Again, no before picture...I really gotta work on that!)


Big Blue: Soooo gorge! I bought this vintage sideboard for my entryway and decided I REALLY wanted a statement piece for people to see when they first walked into our new home. And a statement, it definitely makes.
     Before:
     After: